All the world of cacao in one click.
Unlock the science behind baking the perfect chocolate chip cookies with this tutorial on Maillard reaction, brown butter, and chilling dough.
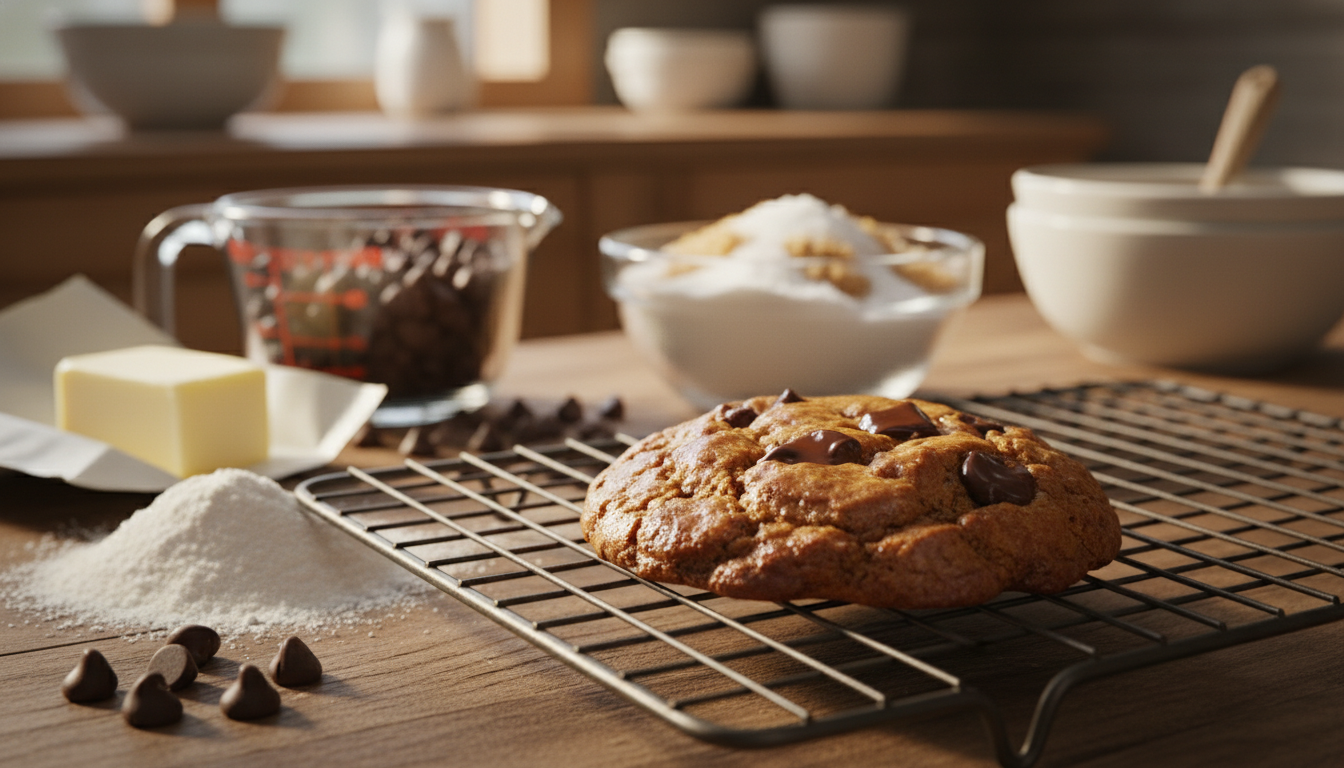
Baking the perfect chocolate chip cookies involves more than just mixing ingredients together. It’s about understanding the science behind the process, particularly the Maillard reaction, which plays a crucial role in achieving the perfect flavor and color.
To create professional-grade cookies, you’ll need to follow a precise recipe and process. This includes using the right ingredients in the correct proportions, as shown in the table below, and following a step-by-step guide to ensure the best results.
By understanding and applying these science-backed techniques, you can elevate your baking to a professional level.
When you bake cookies, a complex chemical reaction known as the Maillard reaction takes place, influencing the final product’s taste and appearance. This reaction is not just limited to baking cookies; it’s a widespread phenomenon observed in various cooking processes involving heat.
The Maillard reaction is a chemical reaction between amino acids and reducing sugars that occurs when food is heated, resulting in the formation of new flavor compounds and browning. This reaction is named after the French chemist Louis-Camille Maillard, who first described it in the early 20th century. The Maillard reaction is responsible for the characteristic flavors and colors of cooked foods, from the browning of bread to the searing of steaks.
“The Maillard reaction is a cornerstone of culinary science, transforming the raw ingredients into something far more complex and appealing.”
In baking, the Maillard reaction plays a crucial role in developing the flavor and color of cookies. It’s what differentiates a merely cooked cookie from one that’s richly flavored and visually appealing. By understanding and controlling the Maillard reaction, you can significantly enhance your baking outcomes.
The Maillard reaction is influenced by several factors, including temperature, pH, and the presence of moisture. By adjusting these factors, bakers can manipulate the extent and nature of the Maillard reaction to achieve the desired results.
The Maillard reaction contributes to both the flavor and color of baked goods. It leads to the formation of new flavor compounds that are often described as nutty, toasted, or caramel-like. Simultaneously, it causes the browning of the cookies, making them more visually appealing.
| Factor | Effect on Maillard Reaction |
|---|---|
| Temperature | Increasing temperature accelerates the Maillard reaction, leading to more pronounced browning and flavor development. |
| pH Level | A higher pH can enhance the Maillard reaction, though extreme levels can lead to undesirable flavors. |
| Moisture | Lower moisture levels can intensify the Maillard reaction, as it concentrates the reactants. |
To maximize the benefits of the Maillard reaction in your cookie baking, consider using ingredients like brown butter, which not only adds flavor but also contributes to a more pronounced Maillard reaction due to its nutty, caramelized notes.

By grasping the principles of the Maillard reaction, you can elevate your baking to the next level, creating cookies that are not only delicious but also visually appealing.
The secret to elevating your chocolate chip cookies lies in the rich, nutty flavor of brown butter. By incorporating brown butter into your recipe, you can add a depth and complexity that regular butter can’t match.
Making brown butter is a straightforward process that requires just one ingredient: butter. To start, place a stick of unsalted butter in a saucepan over medium heat. As the butter melts, it will begin to foam and simmer. Continue cooking, stirring occasionally, until the butter turns a golden brown color and develops a nutty aroma. This process typically takes about 5-7 minutes, depending on the heat and the type of butter used.
It’s crucial to monitor the butter closely, as it can quickly go from perfectly browned to burnt. Once the butter has reached the desired color, remove it from the heat and let it cool slightly.
The flavor profile of brown butter is characterized by its rich, nutty, and slightly caramel-like taste. This is a result of the Maillard reaction, a chemical reaction between amino acids and reducing sugars that occurs when the butter is heated. As noted by culinary expert Harold McGee, “The Maillard reaction is a key process in cooking, leading to the formation of new flavor compounds and browning.”
“The Maillard reaction is a chemical reaction between amino acids and reducing sugars that gives browned food its distinctive flavor.” – Harold McGee
This unique flavor profile enhances the overall taste of your cookies, making them more complex and interesting.
To incorporate brown butter into your cookie recipe, simply replace the regular butter called for in the recipe with the brown butter. Keep in mind that brown butter can be more fragrant and flavorful, so you may want to adjust the amount used based on your personal taste preferences.
When using brown butter in your cookies, it’s also a good idea to chill the dough for at least 30 minutes to allow the flavors to meld together. This step, related to chilling dough, is crucial for achieving the best flavor and texture.
Chilling dough is not just a suggestion; it’s a scientifically-backed step that enhances the flavor and texture of your cookies. When you chill your dough, you’re allowing the flour to hydrate fully, which can lead to a better texture in the finished cookies.
Chilling the dough is crucial because it allows the butter to firm up, making the dough easier to handle and resulting in a cookie that retains its shape better during baking. Moreover, chilling slows down the spread of the cookies, giving them a more defined edge and a chewier center.
The hydration of flour is another critical aspect. When flour is hydrated, the gluten network begins to relax, leading to a more tender cookie. Proper hydration is key to achieving the perfect texture.
The ideal chilling time can vary depending on the recipe and the desired outcome. However, a general rule of thumb is to chill your dough for at least 30 minutes to an hour. For more complex flavors, chilling the dough overnight can be beneficial.
Chilling the dough has a significant impact on both the texture and flavor of your cookies. The slower spread during baking results in a cookie with a better texture. Additionally, the flavor becomes more complex as the ingredients meld together during the chilling process.

“The process of chilling dough is a simple yet effective way to elevate your baking. It’s a step that requires patience, but the payoff is well worth it.”
To create exceptional cookies, selecting the finest chocolate is essential. The type and quality of chocolate used can significantly impact the flavor of your cookies.
You have several options when it comes to choosing chocolate for your cookies. The most common types include semisweet, bittersweet, and milk chocolate. Semisweet chocolate is a popular choice because it offers a good balance between sweetness and bitterness. Bittersweet chocolate provides a deeper, richer flavor, while milk chocolate adds a sweeter and creamier taste.
For the best results, consider using a combination of chocolate types. For instance, pairing semisweet chocolate chunks with a sprinkle of sea salt can enhance the flavor profile of your cookies.

When selecting a brand, look for high-quality chocolate that is known for its flavor and texture. Some recommended brands include Ghirardelli, Guittard, and Valrhona. These brands offer a range of chocolate products that can be used in baking.
The proportion of chocolate to dough can significantly affect the flavor of your cookies. A general rule of thumb is to use at least 60% chocolate chips or chunks relative to the total dough weight.
| Type of Chocolate | Proportion of Chocolate | Effect on Flavor |
|---|---|---|
| Semisweet | 60% | Balanced flavor |
| Bittersweet | 70% | Deep, rich flavor |
| Milk Chocolate | 50% | Sweeter, creamier taste |
Using the right proportion of chocolate and adding a sea salt finish can elevate your cookies to the next level. Experiment with different proportions to find the perfect balance for your taste preferences.
Creating the ultimate chocolate chip cookies requires a deep dive into the ingredients and their proportions. To achieve the perfect chewy texture and flavor, it’s crucial to understand the role of each ingredient and how they work together.
Here’s a list of the ingredients you’ll need for this recipe, along with their Baker’s percentages:
Selecting high-quality ingredients is vital for the best flavor and texture. Here are some tips:

Baker’s percentages are a ratio of ingredients based on the weight of flour, which is set at 100%. This system allows bakers to scale recipes up or down easily and understand the proportion of ingredients. For our recipe, using high-protein flour at 100% means that other ingredients are measured relative to its weight.
For example, with 2 1/4 cups of high-protein flour (approximately 285g), you’ll need 60% of that weight in unsalted butter (171g), which translates to about 1 1/2 sticks.
By understanding and using Baker’s percentages, you can adjust the recipe to suit your needs and preferences, ensuring consistent results.
The journey to perfect chocolate chip cookies begins with a thorough preparation process. This involves understanding the role of each ingredient and the techniques that enhance the final product.
To start, you’ll need to gather all the necessary ingredients. Using high-protein flour is crucial as it contributes significantly to the structure and texture of the cookies. High-protein flour contains more gluten, which, when combined with the right techniques, enhances the cookie’s texture and facilitates the Maillard reaction during baking.
Preparing the brown butter is a critical step that adds depth to the cookies. To brown butter, melt it in a saucepan over medium heat, stirring constantly until it turns golden brown and has a nutty aroma.
Once your brown butter is ready, combine it with the sugars, eggs, and vanilla extract in a large bowl. Mix until smooth. In a separate bowl, whisk together the flour, baking soda, and salt. Gradually add the dry ingredients to the wet ingredients, mixing until just combined. Stir in the chocolate chips.
Chilling the dough is essential for allowing the flavors to meld and the dough to firm up, making it easier to handle. This step also enhances the Maillard reaction during baking, contributing to a richer flavor and better texture.
Chill the dough for at least 24 hours. This resting period allows the flour to hydrate fully, resulting in a more complex flavor profile.
To achieve the ultimate chewy texture, follow these steps to bake your cookies. The use of brown butter in your dough will significantly enhance the flavor and texture of your cookies.
Preheating your oven to the correct temperature is crucial for baking perfect cookies. Set your oven to 375°F (190°C) and ensure it’s fully preheated before you start baking. This temperature allows for the ideal balance between cooking the edges and maintaining a chewy center.
Portioning the dough into the right sizes ensures that your cookies bake evenly. Use a cookie scoop or spoon to portion out the dough into balls, about 1-2 tablespoons each. Place these balls onto a baking sheet lined with parchment paper, leaving enough space between each cookie to allow for spreading.
Bake the cookies for 10-12 minutes or until they are lightly golden brown on the edges and still slightly soft in the center. The brown butter in the dough will contribute to a richer flavor and a chewier texture. Keep an eye on the cookies during the last few minutes of baking, as oven temperatures can vary.
Once baked, remove the cookies from the oven and let them cool on the baking sheet for 5 minutes before transferring them to a wire rack to cool completely. This step helps in setting the cookies and achieving that perfect chewy texture.
Once your cookies are baked, assessing their texture, flavor, and appearance is essential. This evaluation will help you determine if your cookies have turned out as expected and guide you in making necessary adjustments for future batches.
Perfectly baked cookies should have a few distinct characteristics. They should be golden brown around the edges and lightly colored in the center. The texture should be chewy on the inside and crispy on the outside. To achieve this, chilling the dough is crucial as it helps in maintaining the shape and baking the cookies evenly.
A sea salt finish can enhance the flavor of your cookies by adding a touch of saltiness that complements the sweetness of the chocolate. Sprinkling a pinch of sea salt on top of the cookies immediately after baking can make a significant difference in their overall taste.
If you prefer your cookies to be chewier or crisper, adjustments can be made to the baking time and temperature. For chewier cookies, bake them for a shorter time, while for crisper cookies, bake them a bit longer. It’s also important to consider the impact of chilling the dough on the final texture.
| Texture Preference | Baking Time Adjustment | Additional Tips |
|---|---|---|
| Chewier | Reduce baking time by 1-2 minutes | Ensure dough is chilled adequately |
| Crisper | Increase baking time by 1-2 minutes | Use a lower oven temperature |
To keep your cookies fresh, store them in an airtight container at room temperature. If you want to maintain their texture, consider storing them with a slice of bread to keep them soft. For longer storage, cookies can be frozen, but ensure they are wrapped properly to prevent freezer burn.
Now that you’ve mastered the ultimate professional chocolate chip cookies recipe, it’s time to take your baking to the next level. The Maillard reaction, which you learned about earlier, is a crucial element in achieving the perfect cookies. Experimenting with different types of chocolate chunks can also enhance the flavor profile of your cookies.
Try adding different nuts or spices to your dough to create unique flavor combinations. You can also experiment with various types of chocolate chunks, such as dark or milk chocolate, to change up the flavor profile.
Share your cookie creations with friends and family, or post them on social media to show off your baking skills. The joy of baking is not just about following a recipe, but also about sharing the fruits of your labor with others.
Practice makes perfect, and this is especially true when it comes to baking. The more you bake, the more comfortable you’ll become with the recipe and the techniques involved. You’ll be able to refine your skills and make adjustments as needed to achieve the perfect cookies, with a deep understanding of how the Maillard reaction affects the final product.